- Match on action
- Shot/reverse shot
- 180° rule
From the preliminary exercise the main thing I learnt was that we should always make the actor/actress do the full movement to make sure that there are no continuity errors as that is where we went wrong the first time.
Pre-production
Below is a table which explains the difference between the pre-production for the preliminary task and the main task.
 |
| Preliminary Storyboard on the left, Main Storyboard on the right. |
Production
We made sure to use all of the continuity techniques we learnt from the prelim for example over the shoulder shots and match on actions. Our match on action in the preliminary task had a mistake in it so for the main task I made sure to look out for this.
Here is the match on action from our preliminary task. The hand that was used to open the door changes. Below it is the one from our main task. We were constantly checking to make sure that there were no errors.
PRELIMINARY TASK
MAIN TASK
MAIN TASK
Here is the over the shoulder shot from our preliminary task. Below it is the one from our main task.
PRELIMINARY TASK
MAIN TASK
Below is a table which explains the difference between the production for the preliminary task and the main task.
We had a clearer, more organised shoot board for the main task due to the fact we had a lot more shots to film. Below is the shoot schedule from the preliminary task and a page from the main shoot board. The main shoot board is a lot longer and more detailed as well as being better structured compared to our preliminary shoot schedule.
 |
| Shoot Board for Prelim Task |
 |
| Shoot Board for Main Shoot |
There were more locations in our main shoot compared to the preliminary task. Additionally, we were shooting outside in our main task which was more difficult as we had to factor in the weather and also the public as people would be walking up and down the pavement and cars would be driving on the road as well.
 |
| Classroom - Preliminary Task |
 |
| Kitchen and Dining Room - Main Task |
 |
| Bedroom - Main Task |
 |
| On the street - Main Task |
Post-production
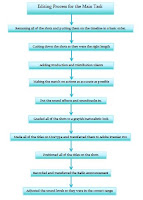
I feel that post-production was where I learnt the most since the preliminary task. Below are two flow charts showing the editing process from the prelim and the main task. The editing process for our film opening was much longer and more detailed than the preliminary task.
Using the edit suite and Adobe Premiere Pro was much easier for the main task as I had experience from the preliminary task.
 |
| Screenshot of the Adobe Premiere Pro Software |
 |
| Us at the edit suite |
We had a lot more footage this time so the editing process was a lot longer for the main task. Additionally we learnt how to grade our footage and add sound effects, a soundtrack and titles which we did not do for our prelim.
Additionally, we used LiveType to create the titles. We had only used it once before in lessons so I didn't have much experience. LiveType was not required for the preliminary task.
Additionally, we used LiveType to create the titles. We had only used it once before in lessons so I didn't have much experience. LiveType was not required for the preliminary task.
Evaluation Process
The evaluation process for both tasks was also different. As we did not have a target audience or chosen genre for the preliminary task, no audience feedback was required. The prelim evaluation was more focused on the technology used and the filming techniques and theories we applied whereas the film opening's evaluation has been more focused on treating the opening as if it was a real media product and the whole process of making and editing a film as well as marketing and distributing it to an audience.
Ultimately I have learnt a lot from this whole project and I have also developed my film-making skills significantly from the preliminary task. The project has been a massive learning curve for me as well as being a lot of fun to take part in. I am really proud of our final product and the progress my group and I have made throughout.


No comments:
Post a Comment